Chapter 01 · How-to guides
How to connect a publishing destination
Connect WordPress, Ghost, Blogger, DEV, or a webhook from the Connections page in about five minutes, then set how articles will arrive there.
Updated Sep 20, 2026 · 4 min read
By the end you will have one destination card reading Connected, with delivery settings saved and ready to receive approved articles. It takes about five minutes once you have the credential to hand. Native connections need a paid plan; on Free you can read the setup but not save it.
Before you start
- A paid Serpio plan. On Free the cards still show, but saving returns "Native publishing connections are available on every paid Serpio plan. Manual exports remain available on Free."
- The credential for the destination, or the account you will sign in with. Each provider guide lists exactly what to create: WordPress, Ghost, Blogger, DEV and Forem, and Webhook.
- For Blogger or WordPress.com, a browser that allows popups for Serpio.
- The right site selected in Serpio. Connections belong to one site; see How to switch between sites.
Steps
- 1
Open Connections
Choose Connections in the sidebar. Connected destinations sort first. Use the search box or the Available filter to find the card you want. A card that is not connected yet reads Connect.
- 2
Open the card
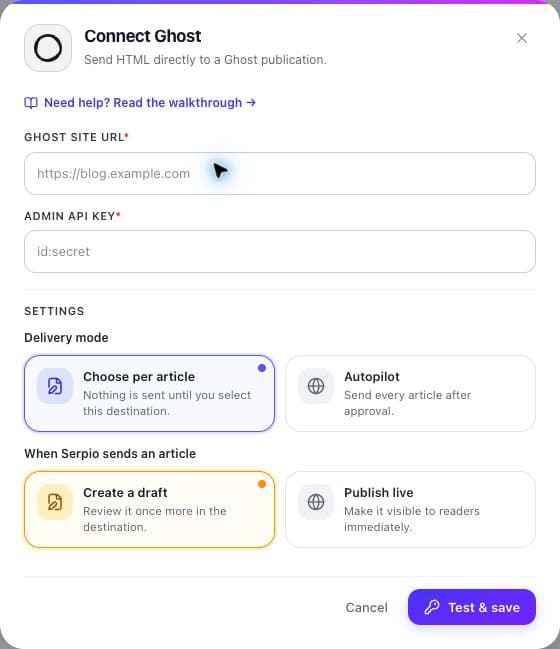
Press the card. A dialog titled Connect followed by the destination name opens, with a Need help? Read the walkthrough link at the top. WordPress shows two tabs, WordPress.com / Jetpack and Self-hosted WordPress; pick the one that matches your site.
- 3
Enter credentials or sign in
For self-hosted WordPress, Ghost, DEV / Forem, and Webhook, fill the credential fields; required ones are marked. For Blogger and WordPress.com, press Connect with followed by the provider name. A popup opens and the button reads Waiting for authorization until you approve.
- 4
Choose delivery settings
Scheduled articles offers Review before sending (scheduled articles stay in Serpio until you publish them) and Send automatically (scheduler-created articles are sent to this destination automatically). When Serpio sends an article offers Create a draft and Publish live. A webhook shows Create destination item only. Keep the review-and-draft defaults for a first connection.
- 5
Press Test & save
Serpio verifies the credential against the destination without creating anything. On failure the message appears in red above the button and nothing is saved. On success the dialog closes and the card reads Connected, unless the destination needs a choice, in which case the dialog stays open.
- 6
Confirm the destination if asked
Blogger and WordPress.com show a Destination block with a Blog or WordPress.com site field. One eligible option is picked for you: "We select the only available option automatically. Choose below when there is more than one." Use Customize destination to change it, then press Save connection. Until you do, the card reads Finish setup.
What happens next
The card reads Connected and shows tags for scheduled delivery and destination state, plus Last article sent once something has gone out. Pressing a connected card opens its connection page rather than the dialog. Manually generated articles can be sent there from the Publish article dialog; see How to publish an article. Connecting sends nothing. Send automatically applies only to future scheduler-created articles.
If something looks off
- The card reads Upgrade: the account is on Free. Upgrade the plan, or use How to export an article.
- No popup appears: the dialog says "Your browser blocked the authorization popup. Allow popups for Serpio and try again." Allow popups for Serpio and press the button again.
- Test & save fails with an authorization message: the credential is wrong or lacks permission. Recreate it as described in the provider guide and paste the full value.
- The card stays on Finish setup: no destination has been saved. Open the card, pick the Blog or site, and press Save connection.
- The dialog says the connection method is not configured yet: that sign-in option is not enabled in your workspace. Use the other tab, or another destination.
Go deeper
- How publishing works in Serpio for the two settings and the one-time delivery rule.
- Provider setup: WordPress, Ghost, Blogger, DEV and Forem, Webhook.
- How to manage your connections for changing settings later.
- Troubleshooting connections when a test keeps failing.
Common questions
Can I connect the same destination twice?
No. Each site in Serpio holds one connection per destination. Disconnect and connect again to change the account.
Does connecting send anything to the destination?
No. Test & save only verifies the credential. Articles are sent from the Publish article dialog, or by autopilot when an article is approved.
Do I have to decide draft versus live now?
No. Both settings can be changed later from the connection page, and changes apply only to new deliveries.
Related guides
How publishing works in Serpio
Approve an article, choose where it goes, and Serpio creates it there once. The two settings every connection has, the five native destinations, the plan gate, and where to see results.
Read guideDestinations and field mapping for native connections
Which connections ask you to choose a site or blog, what Serpio puts in each field at the destination, and when the field mapping controls appear.
Read guideTroubleshooting publishing connections
Symptom by symptom: blocked popups, rejected credentials, missing destinations, failed tests, reconnect prompts, articles you cannot find, and webhook deliveries that go nowhere.
Read guide